Introduction
pcn-k8s leverages some polycube services to provide network support for pods running in Kubernetes.
It supports the cluster Kubernetes networking model, ClusterIP and NodePort services.
Security policies and LoadBalancing service mode are not yet supported.
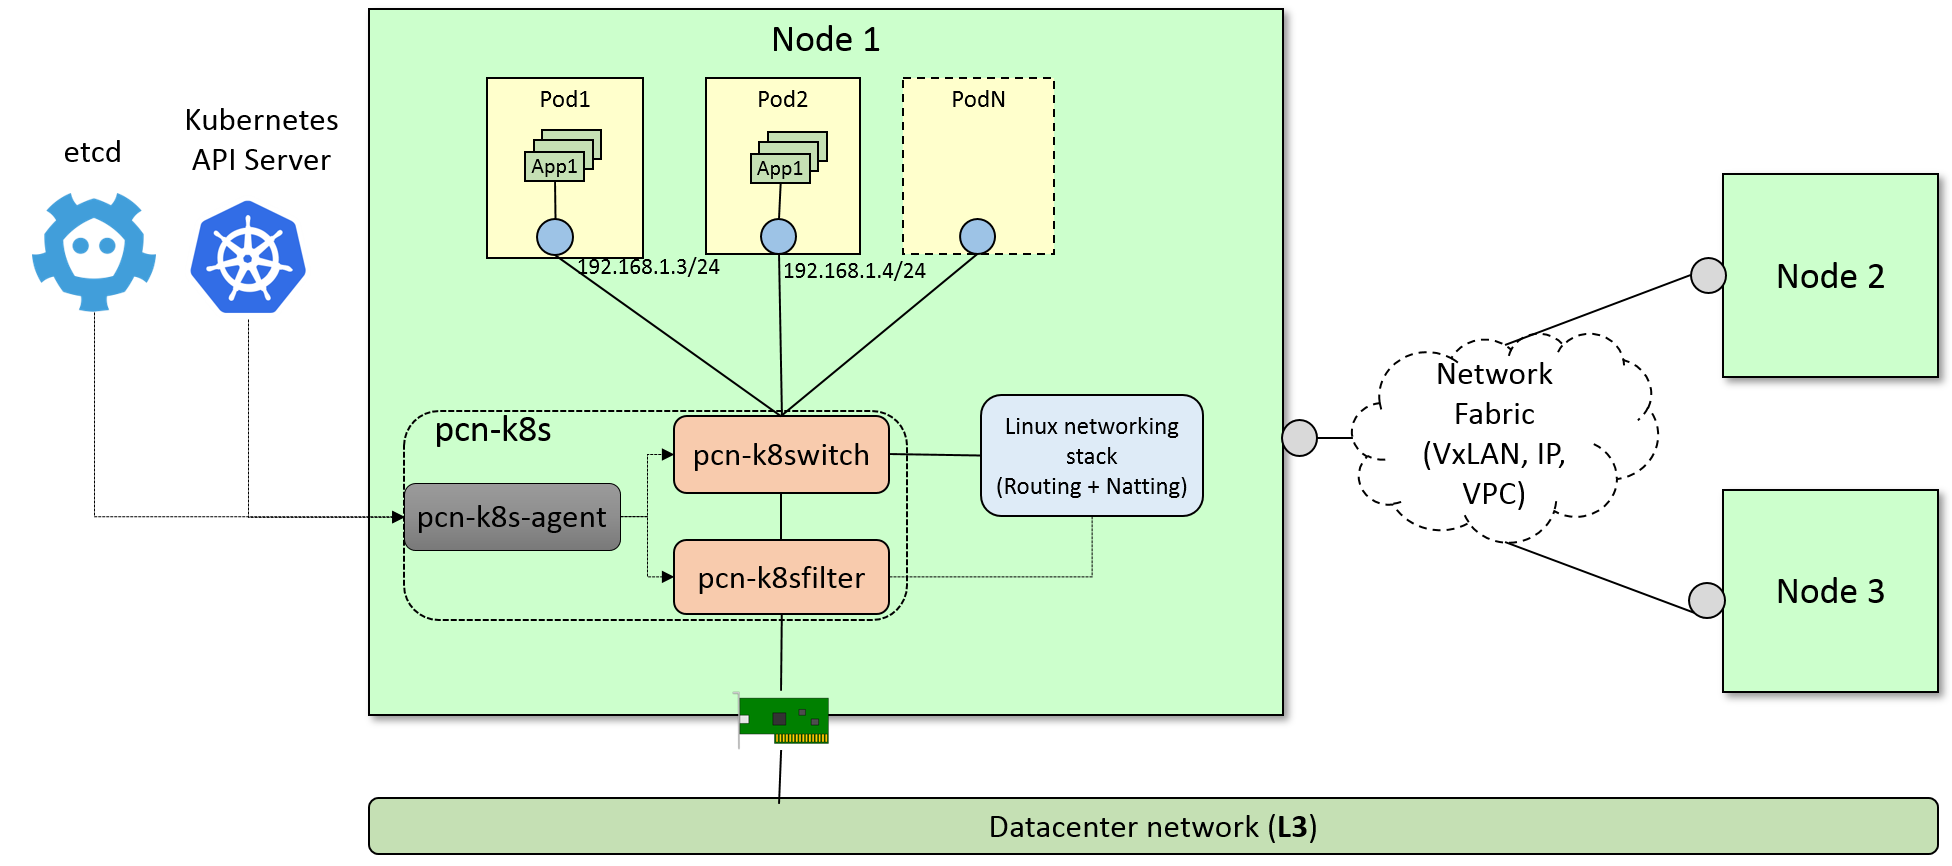
pcn-k8s is made of 3 components:
The
pcn-k8s-agent, which interfaces with the Kubernetes API master service and dynamically reconfigures the networking components in order to create the network environment required by Kubernetes and provide connectivity to the pods.The
pcn-cniplugin implements CNI specification, it connects new pods to thepcn-k8snetworking.pcn-k8switchandpcn-k8sfiltertwo polycube services that implement an eBPF datapath for kubernetes pod networking.
Networking Mode
pcn-k8s supports different methods to communicate pods running in different hosts
overlay networking: when nodes are on different subnets and the user does not have direct control over the physical network an overlay networking is used. The default (and only supported yet) technology is
VxLANdirect routing: when nodes are on the same subnet packets can be exchanged between nodes without encapsulating them
vpc: when nodes run on a cloud provider that supports Virtual Private Cloud (VPC). As of today only aws is supported.
See Configuring pcn-k8s to get more info about how to configure the different modes.
Compatibility
pcn-k8s` is compatible with all versions of Kubernetes equal or greater than 1.9, although we recommend the latest version.
Installation
You may choose either of the below options.
Quick setup with
vagrant(development environment)Using
kubeadmon Bare-Metal or VMs (Single or HA cluster)
1. Quick Setup with vagrant
The fastest mode to test
pcn-k8sincluding setup.
Prerequisites
Download and set up the following packages.
Vagrant (Tested on 2.2.4)
VirtualBox (Tested on 6.0.4)
Follow the instruction below, after the pre-requisite:
Use this PCN-K8S Vagrantfile for your setup.
Execute
vagrant upto bring all the nodes up and running.vagrant statusto check all the nodes and it’s statusvagrant ssh <node-name>to SSH to the node.
Note: This vagrant setup takes care of setting up the kubeadm and joining the nodes along with the pcn-k8s CNI.
2. Using kubeadm on Bare-Metal or VMs (Single or HA cluster)
The easiest way to get started with pcn-k8s using kubeadm.
Please follow the kubeadm installation guide for the most up-to-date instructions.
Once kubeadm is installed, you can create the cluster.
The following commands are intended to be used as a quick guide; please refer to the official single cluster setup guide or HA cluster setup guide for more detailed information.
Initialize master
First, you have to initialize the master by specifying the set of network addresses to be used for pods, such as the following:
sudo kubeadm init --pod-network-cidr=192.168.0.0/16

# In case you're using a multi-cloud cluster or your master has a
# PUBLIC IP/FQDN you may use the below command instead:
# (Replace the --apiserver-cert-extra-sans value with External IP or FQDN)
sudo kubeadm init --pod-network-cidr=192.168.0.0/16 \
    --apiserver-cert-extra-sans="Master External IP or FQDN"
This step will print on screen a command like:
kubeadm join --token <token> <master-ip>:<master-port> \
    --discovery-token-ca-cert-hash sha256:<hash>
Please save the kubeadm join ... command that is printed on screen, which will be used to join the workers nodes later.
mkdir -p $HOME/.kube
sudo cp -i /etc/kubernetes/admin.conf $HOME/.kube/config
sudo chown $(id -u):$(id -g) $HOME/.kube/config
Verify that the system pods are in running state before continuing:
kubectl get pods --all-namespaces
You should see something like:
NAMESPACE     NAME                                 READY     STATUS    RESTARTS   AGE
kube-system   etcd-k8s-master                      1/1       Running   0          1m
kube-system   kube-apiserver-k8s-master            1/1       Running   0          1m
kube-system   kube-controller-manager-k8s-master   1/1       Running   0          1m
kube-system   kube-dns-545bc4bfd4-czf84            0/3       Pending   0          1m
kube-system   kube-proxy-hm4ck                     1/1       Running   0          1m
kube-system   kube-scheduler-k8s-master            1/1       Running   0          1m
pcn-k8s requires an etcd deployment to work, set the etcd_url parameter in pcn-k8s.yaml.
standalone_etcd.yaml provides a basic etcd service that can be used for testing, deploy it before deploying pcn-k8s.
At this point you can install pcn-k8s:
kubectl apply -f https://raw.githubusercontent.com/polycube-network/polycube/master/src/components/k8s/pcn-k8s.yaml
# It will take some time until the images are pulled.

# Optional: if you want to execute pods on the master node
kubectl taint nodes --all node-role.kubernetes.io/master-
Add workers
Workers can be added by executing the previously saved kubeadm join command on each new node, as shown in this example (please note that the actual command will be different on your system):
sudo kubeadm join --token 85856d.feb1e886dd94f7d5 130.192.225.143:6443 \
    --discovery-token-ca-cert-hash sha256:2c3f07b126bdc772e113306f1082ece6c406f130704a1e08a9c67c65542b869d
You can see all the nodes in the cluster using the following command:
kubectl get nodes -o wide
After that, the cluster will be ready to accept requests and deploy pods.
Removing pcn-k8s
In order to remove pcn-k8s execute on the master node:
kubectl delete -f https://raw.githubusercontent.com/polycube-network/polycube/master/src/components/k8s/pcn-k8s.yaml
Configuring pcn-k8s
pcn-k8s uses etcd to save the different configuration parameters.
It is exposed at port 30901 of the master node if you used the standalone_etcd.yaml template to deploy it.
Installing etcdctl
The easiest way to get etcdctl is to download a etcd release and take the binary from there.
The different per-node parameters that the user can configure are:
directRouting (boolean): when this is enabled
pcn-k8swill avoid to create tunnels among adjacent nodes (nodes that are on the same subnet).
example:
ETCDCTL_API=3 etcdctl --endpoints=130.192.225.145:30901 \
    put /nodes/node1/directRouting true
Note that in order to use that feature directRouting must be enabled in both nodes.
vpcMode: specifies the kind of Virtual Provide Cloud where the node is running in. When this is set to a value provider (only aws is supported now) it configures the VPC and avoid creating tunnels to other nodes running on the same VPC. If this is empty, the vpc support is disabled.
ETCDCTL_API=3 etcdctl --endpoints=130.192.225.145:30901 \
    put /nodes/node1/vpcMode aws
publicIP: In deployments where nodes are behind a NAT, you need to manually configure the public IP of the nodes in order to allow
pcn-k8sto reach them from the external world. A typical example is when nodes are installed in different cloud providers, such as Amazon and Google, but are all part of the same k8s instance. In this case you can use the following command, which has to be repeated for each node that is behind the NAT:
ETCDCTL_API=3 etcdctl --endpoints=130.192.225.145:30901 \
    put /nodes/node1/publicIP 198.51.100.100
Running in aws
In order to let pcn-k8s interact with aws an Identity and Access Management (IAM) role is needed.
Create Policy: Go to the IAM Management Console, then select Policies on the left and then Create policy with the following JSON content:
{
  "Version": "2012-10-17",
  "Statement": [
    {
      "Sid": "VisualEditor0",
      "Effect": "Allow",
      "Action": [
        "ec2:DescribeInstances",
        "ec2:CreateRoute",
        "ec2:DeleteRoute",
        "ec2:ModifyInstanceAttribute",
        "ec2:DescribeRouteTables",
        "ec2:ReplaceRoute",
        "iam:PassRole"
      ],
      "Resource": "*"
    }
  ]
}
Create Role: Go to the IAM Management Console, then select Roles on the left and then Create role. Select the EC2 service, click on Next: Permissions button on bottom right, select the name of policy that you’ve created in the above step and click Next: Review button; set a name to the policy with some description and click on Create role button.
Attach Policy to role: Go to the IAM Management Console, then select Roles on the left and click on the role name that you’ve created in above step, go to Permissions tab and click Attach policies. Then search and select for AmazonEC2FullAccess, IAMReadOnlyAccess and PowerUserAccess policy and click on Attach policy to complete the step.
Assign the IAM role (that you’ve created in above step) to the EC2 instances while you create them.
Note: VxLAN exchanges traffic on port 4789/UDP, be sure that you have configured security rules to allow it.
Testing your pcn-k8s installation
We present here some commands to test that your pcn-k8s deployment works as expected.
In order to run these tests, a cluster having at least two schedulable nodes (not tainted) is needed.
Deploy services and pods to test
kubectl create -f https://raw.githubusercontent.com/polycube-network/polycube/master/src/components/k8s/examples/echoserver_nodeport.yaml
kubectl run curl1 --image=tutum/curl --replicas=5 --command -- sleep 600000
After a short period of time, all pods should be in the Running state
k8s@k8s-master:~$ kubectl get pods -o wide
NAME                            READY     STATUS    RESTARTS   AGE       IP              NODE
curl1-5df485555f-2dpwx          1/1       Running   0          1m        192.168.1.3     k8s-worker2
curl1-5df485555f-l7ql4          1/1       Running   0          1m        192.168.0.246   k8s-master
curl1-5df485555f-s9wsv          1/1       Running   0          1m        192.168.1.5     k8s-worker2
curl1-5df485555f-xh4wv          1/1       Running   0          1m        192.168.1.4     k8s-worker2
curl1-5df485555f-xqmxn          1/1       Running   0          1m        192.168.0.245   k8s-master
myechoserver-86856fd86f-fkzg6   1/1       Running   0          32s       192.168.1.6     k8s-worker2
Tests
The following section present some test cases to check everything is working as expected.
Test Node to Pod connectivity
# ping pod in master node
k8s@k8s-master:~$ ping 192.168.0.245

k8s@k8s-master:~$ ping 192.168.1.3
Test Pod to Pod connectivity
# select one pod running on master, in this case (192.168.0.245)
k8s@k8s-master:~$ ID=curl1-5df485555f-xqmxn

# ping pod in master
k8s@k8s-master:~$ kubectl exec $ID ping 192.168.0.246

# ping pod in worker
k8s@k8s-master:~$ kubectl exec $ID ping 192.168.1.5
Test Pod to Internet connectivity
# ping to internet
k8s@k8s-master:~$ kubectl exec $ID ping 8.8.8.8
Test ClusterIP service
The following command will give us the details about the service we created:
k8s@k8s-master:~$ kubectl describe service myechoserver
Name:                     myechoserver
Namespace:                default
Labels:                   app=myechoserver
Annotations:              <none>
Selector:                 app=myechoserver
Type:                     NodePort
IP:                       10.96.23.23
Port:                     <unset>  8080/TCP
TargetPort:               8080/TCP
NodePort:                 <unset>  31333/TCP
Endpoints:                192.168.1.6:8080
Session Affinity:         None
External Traffic Policy:  Cluster
Events:                   <none>
# direct access to the backend
k8s@k8s-master:~$ curl 192.168.1.6:8080

# access from node to ClusterIP
curl 10.96.23.23:8080

# access from a pod (change ID to both, a pod in the local node and also a pod in a remote node)
kubectl exec $ID curl 10.96.23.23:8080
Test NodePort service
The service is exposed in port 31333, perform a request to the public IP of the master and the node from a remote host.
# request to master
curl 130.192.225.143:31333

# request to worker
curl 130.192.225.144:31333
TODO: - test dns service - test scale-up scale down
Troubleshooting
Recovering from a pcn-k8s failure
pcn-k8s expects a clean environment to start with and it is likely to fail if this is not verified.
In case you hit any problems, please follow the next steps to recover from a failure:
#1. Remove pcn-k8s
kubectl delete -f https://raw.githubusercontent.com/polycube-network/polycube/master/src/components/k8s/pcn-k8s.yaml

#2. Disable DNS
kubectl -n kube-system scale --replicas=0 deployment/kube-dns

#3. Remove garbage network interfaces and iptables(if any)
ip link del dev pcn_k8s
ip link del dev pcn_vxlan

#4. Relaunch pcn-k8s
kubectl apply -f https://raw.githubusercontent.com/polycube-network/polycube/master/src/components/k8s/pcn-k8s.yaml

# Wait until all pcn-k8s containers are in running state
kubectl get pods --all-namespaces

#5. Reenable DNS
kubectl -n kube-system scale --replicas=1 deployment/kube-dns
Inspect cube status inside pcn-k8s
pcn-k8s is deployed as container in each node, sometimes it is helpful to inspect the cube(s) status
within the container for debugging or other purposes. You can login into each node where the pcn-k8s container is running and get the information via polycubectl command locally.
A more convenient way to do that is using kubectl in k8s master node, first identify the name of pcn-k8s pod running in a particular node you are intereted by executing the following command:
- ::
kubectl get pods -n kube-system -o wide
You should see somthing like:
NAME                               READY   STATUS             RESTARTS   AGE   IP                NODE       NOMINATED NODE   READINESS GATES
kube-proxy-dbjm6                   1/1     Running            0          28d   192.168.122.200   dev-ws12   <none>           <none>
kube-proxy-stlsc                   1/1     Running            0          28d   192.168.122.201   dev-ws13   <none>           <none>
kube-scheduler-dev-ws11            1/1     Running            1          28d   192.168.122.199   dev-ws11   <none>           <none>
polycube-8k25h                     2/2     Running            0          25d   192.168.122.200   dev-ws12   <none>           <none>
polycube-etcd-559fb856db-77kmr     1/1     Running            0          28d   192.168.122.199   dev-ws11   <none>           <none>
polycube-sddh5                     2/2     Running            0          25d   192.168.122.201   dev-ws13   <none>           <none>
polycube-zrdpx                     2/2     Running            0          25d   192.168.122.199   dev-ws11   <none>           <none>
The pod name with prefix polycube- is pcn-k8s pod, there are a few of them in the output but only one for
each node. Let’s assume you want to inspect the pcn-k8s in node dev-ws13, the following command can be
executed in k8s master node
kubectl exec -it polycube-sddh5 -n kube-system -c polycube-k8s polycubectl show cubesv
Here is the output for example,
k8sfilter:
 name  uuid                                  service-name  type  loglevel  shadow  span   ports
 k8sf  6258accd-c940-4431-947c-e7292d147447  k8sfilter     TC    INFO      false   false  [2 items]

k8switch:
 name       uuid                                  service-name  type  loglevel  shadow  span   ports
 k8switch0  c058b8fb-0e57-4ff6-be4d-5f3e99e71690  k8switch      TC    TRACE     false   false  [7 items]